DIY Herbal Fellowship

Cultivating confidence in using herbs and essential oils

  • DIY Herbal Fellowship
  • Start Here
    • DIY Herbalist Way
      • I’m a Sprout!
      • I’m a Seedling!
      • I’m Growing!
      • I’m Blossoming
      • I’m Fruitful!
  • Choose Your Own Herbal Adventure
  • Herb of the Month Club
    • Search the Herb of the Month Club
  • Techniques
  • Bonuses
    • Goal Planning For Herbalists
    • Herbalist Viral Protocol
  • Log In
  • Support
    • Join Us
    • F.A.Q
You are here: Home / Herb Camp / Herb Camp Day 15: Creative Eco-Print Dyeing

Herb Camp Day 15: Creative Eco-Print Dyeing

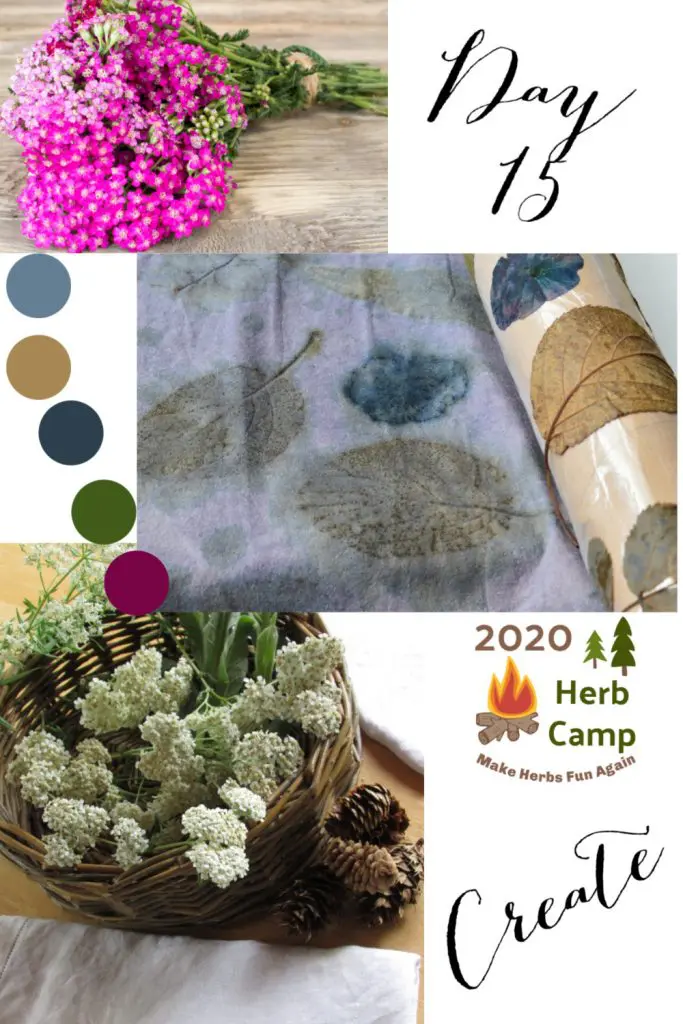
WELCOME TO HERB CAMP 2020!

In this third of three weeks of herb camp, the theme is “Herbal Creativity”  In this final week of herb camp we’ll explore ways to use your garden herbs creatively.

In today’s Herb Camp Challenge we’ll look at Eco Print natural dyeing.

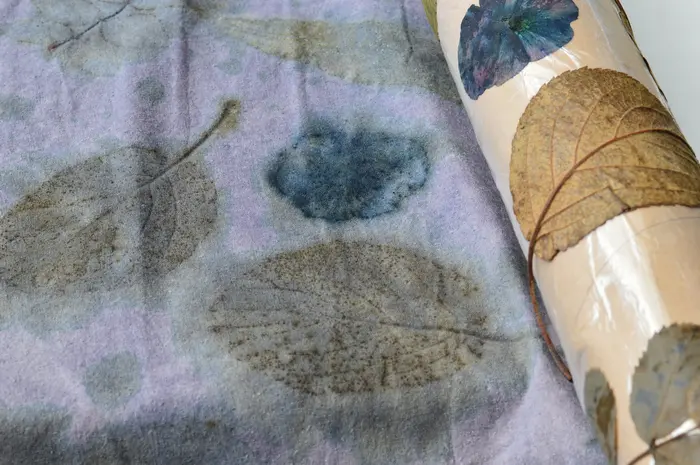
Eco-printing is a form a natural dyeing that uses the leaves and flowers of plants directly on cloth, allowing the plant material to leave an imprint on the cloth.  The flavonoids in the plants break down and transfer their color to the cloth.

You can read more about the process here:

How to Eco-print on Silk

This project will take longer than our usual 15 minutes a day.  But once you have it set up and understand the process, you will be able to repeat the process over and over, in 15 minute increments.  Step 1 and Step 2 can be done on several pieces of fabric all at once, and then the actually eco-printing can be done at your leisure.  Many people use thrift store finds as their fabric.  If you want to do that, look for garments that are 100% silk or 100% wool.  100% cotton garments can be used but the mordanting procedure is more complicated than the instructions I’m giving here.


How to prepare fabric for eco print dyeing

Eco print dyeing works best on silk or wool fabrics.  Other natural fabrics can be used but the plant dyes seem to cling better to protein fibers.

Step 1 — Scour the Fabric

Wash the fiber with a mild detergent to remove any sizing or fabric coating.  Some fabric is sold as RTD or Ready to Dye, and doesn’t require this step.  But it should still be wetted before eco printing.

Step 2 — Mordant the Fabric

Mordanting is an essential step in dyeing with natural dyes, whether you are eco printing or dip dyeing your fabric.  The mordant allows the color molecules to adhere to the fabric and remain.  Mordanting makes the color fast and inhibits fading with light and washing.

Potassium aluminum sulphate (alum) is the easiest and safest mordant to use when dyeing with natural dyes on silk or wool fabric.  It gives clear bold colors to protein fibers.  Use 12 grams of alum to 100 grams of silk or wool fabric.   Please wear a face mask rated for particulate matter (N95) when handling alum powder.

Dissolve the alum in hot water in a plastic bucket.  Immerse the fabric.  If the fabric floats on the surface of the bucket, weight it down to keep it submerged.

When using hot water, ensure that silk fabrics remain below 180 degrees F. to avoid damaging their luster.  Leave it overnight in the bucket.  Remove from the bucket and rinse in cold water.  Its ready for the next step.  If you plan to continue the project later, the mordanted material can be dried at room temperature and put aside for later use.

For cotton or linen garments or fabric you’ll need a different mordant, such as aluminum acetate, which can be purchased from a natural dye house.  See this article for instructions on mordanting cotton. 

Rayon (bamboo, tencel, etc) will also dye with natural dyes. Since it is a cellulose fiber use the same mordant that you would with cotton.  Other man made fibers like polyester will not dye with natural dyes, so avoid blends of cotton and polyester garments or fabrics.

Step 3 — Under-dye the fabric with natural dyes

This step is optional but adds to the vibrancy of the colors in eco-print dyeing.  If you are new to natural dyeing skip this step and move to Step 4.

If you wish to, you can under dye with a light under-color on the fabric before you begin the actual botanical print.  To do this create a dye bath using natural dye plants such as:

For yellows:

  • Golden Rod
  • Dyer’s Weld
  • Onion Skins
  • Coreopsis
  • Oregon Grape Root
  • Turmeric Root
  • Dyer’s Greenwood
  • Apple leaves
  • Rose leaves
  • Marigold flowers

For reds and corals:

  • Madder root
  • Cochineal
  • Bedstraw Roots
  • Prickly Pear Cactus Fruit
  • Red rose petals
  • Deep red flowers


For Blues and purples:

  • Woad Leaves
  • Indigo Powder
  • Japanese Indigo
  • Log wood chips
  • Sunflower centers or seeds


For Browns (Tannin + iron)

  • Nut leaves
  • Tea
  • Coffee

Use the instructions for the natural dyes of your choice.  For instance for yellows create a simmer dye bath and keep the temperature below 180 degrees F. for silk.  Madder should be cold water dyed.  Indigo requires a fermentation process to create a reduction dye vat.

Step 4 — Gather your plant materials

Go for a pleasant walk and take your gathering basket.  Your personal place and the season that you gather in will determine your colors.  This is the most fun. Go here to see Sarah’s ecoprint with woad on silk scarves.

The colors that will adhere to the fabric come from the same plant constituents as the plant’s antioxidants and medicinal qualities.  The flavonoids, the anthocyanins, and the tannins in the plants along with the minerals carry the color to your cloth.  These are the same constituents that hold the anti-inflammatory, pain relieving, anti-microbial, anti-fungal, and therapeutic actions that we value medicinal herbs for.

In ayurvedic tradition cloth is dyed with natural dyes in order to carry the therapeutic benefits of the plant to the person wearing the cloth.  Since we’ve lost the cultural significance of natural color we’ve also missed our own understanding of the way plants offer their virtues through their color signatures, to our loss.  Ecoprint dyeing is an easy way to bring this knowledge back, as the fabric is not only colored with natural dyes but the signature leaf, flower, or seed shape is imprinted on the cloth, as well. This leaves a permanent record of the plants used to dye the cloth.


Hint:  Eco-printing can also be done on paper, leather, and other natural cellulose or protein fibers.  This is a fun project to do with children.

More about this coming up in a future masterclass.

Your turn:

Take a photo of your project and upload it to the Facebook group here or (if you are not on Facebook) upload your photo to a photo sharing site and share the link here in the comments so we can admire your work.

Note: Click the small arrow on the LEFT to go to the previous day’s Herb Camp Challenge. Click the small arrow on the RIGHT to go to the next day’s Herb Camp Challenge.

«
»

Herb Camp, Wildcrafting 5

Comments

  1. Kelly Pakes says

    07/07/2020 at 3:40 pm

    I have been meaning to do sun printing but have not had time to do it. I have some PFD fabric. I am a quilter and some quilters design their own fabrics with sunprinting.

    Log in to Reply
    • Chris dl says

      07/22/2020 at 8:42 am

      That’s very cool. I’ve seen sun printing but I’ve never done it.

      Log in to Reply
  2. Bobbi Thompson says

    06/16/2020 at 1:28 pm

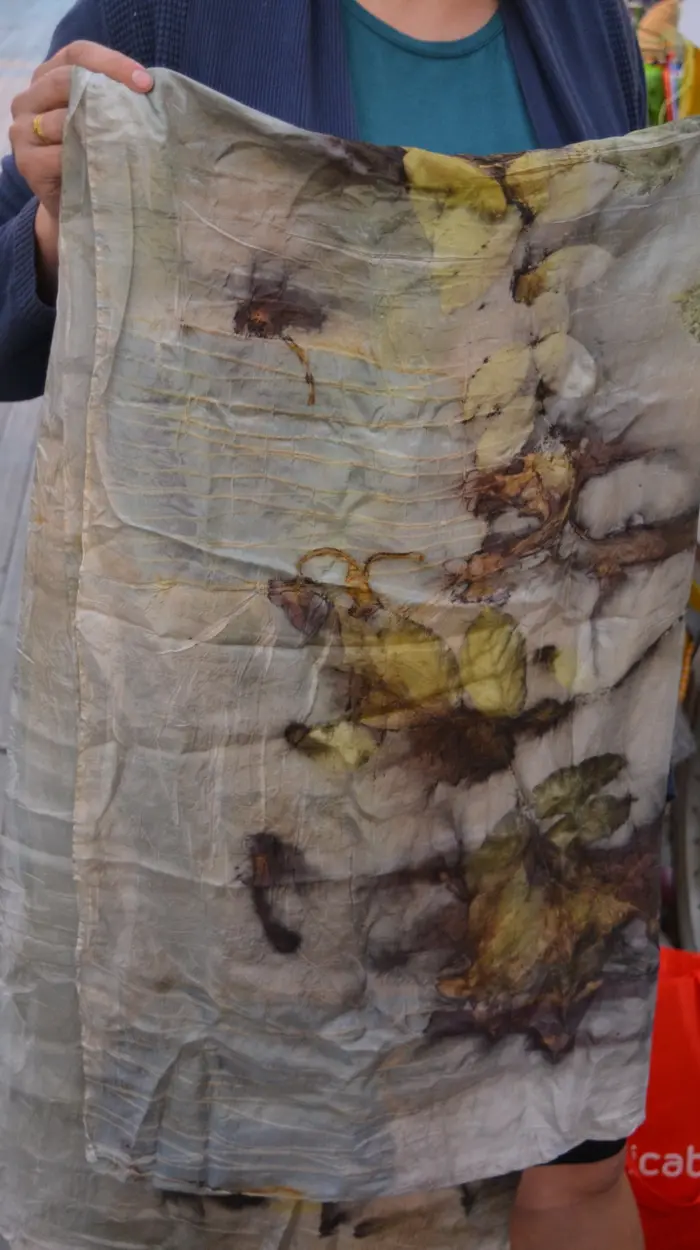
    By the way the scarf in the photo is lovely.
    Did you underlay the background and then do the leaf prints?

    Log in to Reply
    • Chris dl says

      06/24/2020 at 6:46 am

      Yes. It has a logwood underdye. Then the leaves were applied to the surface of the fabric

      Log in to Reply
  3. Bobbi Thompson says

    06/16/2020 at 1:28 pm

    Will have to gather some supplies for this project as well..
    Will have to try this with my granddaughter.

    Log in to Reply

Leave a Reply Cancel reply

You must be logged in to post a comment.

Welcome back member! Log in here!


Forgot Password

The DIY Herbal Fellowship is here to help you invest in self-reliance, cultivate community, and grow in resilience, through confidently growing and using herbs for food, and for health and wellness. Welcome to the Resistance!

Q and A Search

We are here for you!

Or email: support@thediyherbal.com


Frequently Asked Questions

How is the DIY Herbal Fellowship different from other herbal programs like the Herbal Academy?

At the DIY Herbal Fellowship, we emphasize homegrown and foraged herbalism. We teach how to grow your own medicine, so you aren't dependent on the global supply chain for your wellness.

In the classes from other herb schools you'll get a long list of herbs you need to buy in order to complete the classes and a lot of these herbs are from herbal traditions from tropical climates, so you will need to buy imported herbs, that may have been in storage a long time before they reach you.  Herbs you can grow and harvest close to where you live have been challenged by the same stressors that you've been challenged with and they have the unique metabolites that you need to thrive.

We also provide a list of herbs that you can buy if you don't have access to a garden or places you can forage, but growing your own gives you access to that unique property in herbs, that you can't buy in a store.

I’ve enrolled in herb classes from other herb schools that I didn’t complete. Can I successfully complete anything inside the DIY Herbal Fellowship?

Joining the DIY Herbal Fellowship can give you the support you need to complete the courses you've already signed up for, if you still have access to them.  Many of our members are also working through certificate programs at Herbal Academy or other herb schools. They use the support and the methods we teach in the DIY Herbal Fellowship to help them systematically work through their other courses and retain the information they are learning.

The masterclasses inside the DIY Herbal Fellowship are different than what you'll find in other herb schools.  We have success built into each masterclass.  The lessons are designed to be completed during a break time, so that busy women don't get left behind.  (Aren't we all very busy!)Each lesson inside the masterclasses are just 15 to 20 minutes long.  The hands on projects can be done in the margins, while you are working on other things, like supervising homework, or waiting for dinner to cook.  You don't need to wait till you have a few hours alone-time to get started.  15 minutes can be a start.

Also you'll enjoy quarterly implementation challenges to encourage you along your journey.  These include games or other strategies to keep you moving forward to reach your goals and master the aspects within herbal studies that are important to you.

If you have a life challenge though, and can't complete the monthly masterclasses for a period of time, you don't lose access to them, as long as you remain a member in good standing.  The masterclasses will wait for you.

How much time does it take to complete a masterclass? I don’t have a lot of time.

You'll want to have at least one hour a week to dedicate to the DIY Herbal Fellowship, to complete at least one masterclass a month, do the hands on projects, participate in the Q and A and the coffee chat.  If you don't have that much time, you might feel frustrated inside the DIY Herbal Fellowship because you'll miss the interaction and the support.  If you have more than one hour a week available, you'll be able to do several masterclasses each month.  Each masterclass takes between one hour and 1 1/2 hours to complete.  You'll get a certificate after you complete each masterclass, so you'll have a record of the time you've invested in your herbal learning.

What’s the difference between the membership and your courses at Joybilee Academy?

The courses at Joybilee Academy are generally longer.  They don't have active support, so there are no live Q and As, no coffee chats, no dedicated Facebook group to ask questions or get feedback.  Its for people that want to learn from me but don't need or want active support.  The courses are also static.  No new material is added once the course is published.  Only one of the classes in Joybilee Academy has a certificate on completion.

On the other hand, the membership has a monthly masterclass that is designed so that you can watch each lesson during a coffee break, for those that don't have a lot of time.  There is an active component focused on hands on application for the lessons.  We learn better when we apply what we learn through hands on projects, so we integrate that into the classes. You have something to show for what you learned. There is a live monthly Q and A where the members can ask questions and get feedback.  It is recorded so those who can't make it live can view it. Also (the fellowship part) we have a monthly coffee time (not recorded) where members can get together and build relationships, network, and share.  Quarterly, inside the membership, we'll do challenges and games to help with implementation and improve how much people remember of the masterclasses. These are great for making progress on your goals and cheering others on, building relationships inside the community.

The membership has a dedicated Facebook group where members can connect, ask questions, get feedback, share information. I'm in that group daily.

Why do you need my mailing address?

Please use your best mailing address when you give us your contact information.  While there are no physical products included with the monthly membership purchase, there are periodic surprises that may be mailed out to members, so your mailing address is required when you register.

To ensure that parcels mailed to you don't get returned by the post office, please keep your mailing address up to date.  Periodically we will ask members to update their mailing address in their member account so that we can make your experience as a DIY Herbal Fellowship member awesome.

I’m a member. How do I enroll in one of the Masterclasses?

It's easy to enroll in any of the masterclasses on the site

Step 1: Log into the site using your user name and password.   If you forget your password just click on the "lost your password?" link and it will send you an email to let you reset your password.  Go here to log in.
Once you log in you'll be taken to your personal dashboard.  Here you'll see an icon that says, "Courses".  Tap/click on this icon to see all the masterclasses you have access to, in alphabetical order.  You can tap/click on the link for any of these courses to begin the course.
If you've already taken a course you'll find it under the "Profile" icon in your dashboard.  If you've already enrolled in a course, you'll find your progress under "courses" in your profile.
You'll find all the courses you have access to in your dashboard so that you can get started on that right away and get a good foundation.
Step 2: To enroll in a new DIY Herbal Masterclasses go to this link: https://thediyherbal.com/courses/ inside your dashboard.  All classes are in alphabetical order.  You can use both the search function and the category function to browse the catalog of courses.
Go to the class that interests you.  Tap/click the green "Start" button to begin any lesson.  Move through the course using the bar at the top of the page.  If you are viewing your courses on your cell phone, it's helpful to turn the screen horizontally to see the green button used for navigation, at the top of each lesson.
Step 3:  You can get back to your courses and pick up where you left off, clicking or tapping on the course icon in your dashboard under "courses" or in your profile area of the membership site.

How do I update my payment method?

This video will guide you through to update or change your payment method in your dashboard:

Herb of the Month

Masterclass

Privacy Policy

Privacy Policy

Terms of Use

Dislosure


  • Start Here
  • F.A.Q
  • Support
  • Privacy Policy
  • Terms and Conditions

Copyright © 2025 · Darling theme by Restored 316

Copyright © 2025 · Darling Theme on Genesis Framework · WordPress · Log in